Migration
Free migration service for Ximplify
Whether you are on a freemail, in-house or hosted email environment, we provide you with simple and powerful migration tools to help you seamlessly migrate your existing mailboxes to Ximplify with zero downtime.
You can use our intuitive self-migration guide or let us assist you with our free migration service. Either way, we ensure your email migration is easy and successful.
How to migrate existing emails to Ximplify?
-
Login to Ximplify webmail at https://mail.domainname.com
1.1Reset your password
*A minimum of EIGHT [8] characters in length with at least ONE UPPERCASE LETTER, ONE LOWERCASE LETTER and 1 NUMBER in the password. Every password will valid for 12 months.
1.2Set the country and click "Next"
1.3Enter a backup email address. Click "Finish".
-
Click on "Settings".
2.1Click on "Advance Settings" folder.
2.2Choose "Others". Click "Next"
2.3Place a check mark on "Email", click "Next".
-
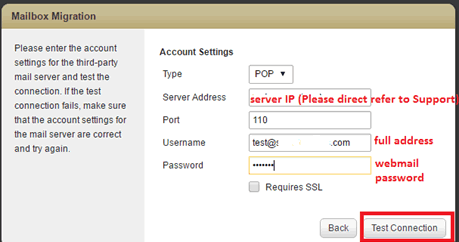
Enter the information of the current email.
Type: POP
Server Address: (This please refer to our Support)
Port: 110
Username:
Password:
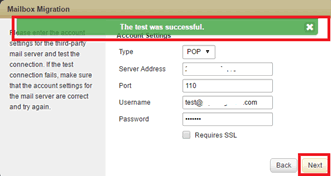
3.1Click on "Test Connection"
3.2A popup message appear, click "Next".
3.3Click "Start".
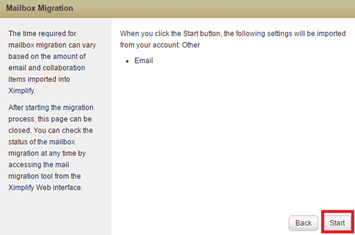
3.4Once the Migration status appeared "Done", close the pop-up.

How long does it take to migrate my mailboxes?
Migration times vary per customer. Some migrate in hours and others migrate in days depending on the amount of mailboxes and data size. At each steps of the migration process, we stay in close contact with your team to help you get a successful outcome.
How much does a migration to Ximplify cost?
Getting your emails migrated to Ximplify is free of charge. You have the option to migrate yourself or contact our Free Migration Service Team to start the process.
What we migrate?
Whether you choose a Self-Service Migration or select our Free Migration Service, our team of migration experts backs you every step of the way. We migrate the following platforms
- Microsoft Office 365 - Emails, Calendars, Contacts, Tasks, Journals, Notes
- Exchange Server 2003 and later - Emails, Calendars, Contacts, Tasks, Journals, Notes
- Google Apps/Gmail - Emails, Calendars, Contacts
- IMAP – Emails
- From UUCP To POP3 - Emails
- Lotus Notes 6.5 and later - Emails, Calendars, Contacts, Tasks
- POP - Emails
- Merak - Emails, Calendars, Contacts, Tasks
If you have other email platforms, send an email to [email protected] and we will advise how best to migrate to Ximplify.
What type of information do I need to prepare for migration?
Once you have sign up and submit your migration request to [email protected], our team will be in contact to assist with this process. You could also submit your request by clicking here.
Email
How to create and delete user?
Domain owner will receive the access details to log into your postmaster account.
- Login to into the postmaster account by using the link and details provided by Ximplify Support.
- Enter the details of admin access as per email from our Support.
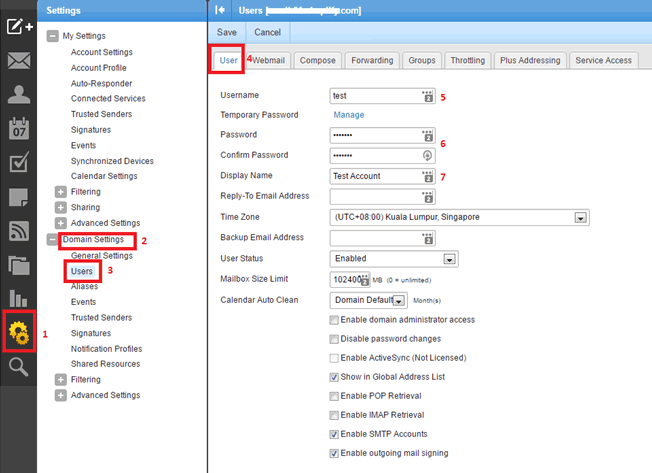
- Click on 'Settings'
3.1Click on 'Domain Settings'
3.2Click on 'Users'
3.3Click on 'New'
3.4Fill up user details
3.5Click on 'Save'
How to create a signature?
- Login to Webmail under your e-mail account
- Click Settings (left side icon)
- Under left tree menu Click My Settings > Signatures
- Click Signatures tab
- Edit Default Signature or Create New Signature
- Name and Build your Signature
- Click Save
- After you save your signature, you must select your signature from the pull-down box
- After you select your new signature, click Save again.
How to reset password?
- Login to webmail (https://mail.example.com)
- Click Setting – Account Settings (My Settings)
- Please enter your “New Password” followed by "Confirm Password"
- Click on Save
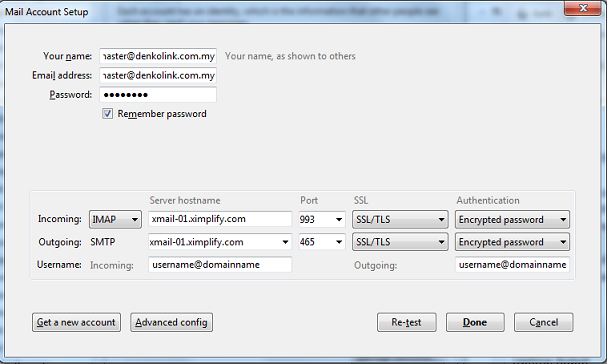
How to set up email configuration in email programs?
Once you had open your mail software, please choose either you need to create an IMAP or POP3 account. The different of both as per below link:
POP3 vs IMAP
The main configuration is as below:
With SSL connection:
Email server Host Name both for Incoming and Outgoing : xmail-01.ximplify.com
POP3 Incoming Port : 995
POP3 Outgoing Port : 465
OR
IMAP Incoming Port : 993
IMAP Outgoing Port : 465
Incoming server supports SSL? (yes or no): YES
Outgoing server supports SSL? (yes or no): YES
Without SSL connection:
Email server Host Name both for Incoming and Outgoing : mail.domainame
POP3 Incoming Port : 110
POP3 Outgoing Port : 366 or 587
OR
IMAP Incoming Port : 143
IMAP Outgoing Port : 366 or 587
Incoming server supports SSL? (yes or no): NO
Outgoing server supports SSL? (yes or no): NO
Further info please check on your mail client programs as below:
+
Configuring your mailboxes in Microsoft Outlook 2010 (MSOLK 2K10)/ 2013 (version 15)
- Click on the "file" TAB
- Click "Info"
- Click on the big square button that says "Account Settings"
- Click "Add or Remove accounts or change"
- Click "New" under the EMAIL TAB
- Select "E-mail Account"
- Click "Next"
- Select 'Manually configure server settings or additional server types'
- Click "Next"
- Select 'Internet Email'
- Fill in Your Name – type in the name that your recipients will see
- Fill in the Email Address – type in your complete email address
- Select Account Type as “POP3”
- Fill in Incoming mail server (POP3) – type in mail.domainame
- Fill in Outgoing mail server (SMTP) – type in mail.domainame
- Fill in User Name - type in your complete email address
- Fill in Email Password – type in the password for this email account
- Put a CHECKED/TICKED next to "Remember Password" to save your password
- For Log on using Secure Password Authentication (SPA) – do not check this box
- Once you have filled in the above information, click "More Settings" button
- Click "Outgoing Server" TAB (on top)
- Checked (TICK) "My outgoing server (SMTP) requires authentication"
- Select the radio button "Use same setting as my incoming mail server"
- Click "Next" then the test screen will appear showing both incoming and outgoing server tested successfully
- Finally, click Close and then click Finish to complete your email setup
+
Configuring your mailboxes in Microsoft Outlook 2007 (MSOLK 2K7)
- From the top menu bar, click on Tools and select Account Settings
- Click the "New" button
- Checked (TICK) the box next to Manually configure server settings or additional server types and click "Next" button
- Fill in Your Name – type in the name that your recipients will see
- Fill in the Email Address – type in your complete email address
- Fill in Incoming mail server (POP3) – type in mail.domainame
- Fill in Outgoing mail server (SMTP) – type in mail.domainame
- Fill in User Name - type in your complete email address
- Fill in Email Password – type in the password for this email account
- Put a CHECKED/TICKED next to "Remember Password" to save your password
- For Log on using Secure Password Authentication (SPA) – do not check this box
- Once you have filled in the above information, click "More Settings" button
- Click "Outgoing Server" TAB (on top)
- Checked (TICK) "My outgoing server (SMTP) requires authentication"
- Select the radio button "Use same setting as my incoming mail server"
- Click "OK" to confirm the settings.
- Finally, click Next and then click Finish to complete your email setup.
+
Configuring your mailboxes in Microsoft Outlook 2000/2003 (MSOLK 2K/ MSOLK 2K3)
- Click on the Tools menu in MSOLK
- Click on Email Accounts
- Click Add a new Email Account
- Click Next
- Select POP3
- Click Next
- Fill in Your Name – type in the name that your recipients will see
- Fill in the Email Address – type in your complete email address
- Fill in Incoming mail server (POP3) – type in mail.domainame
- Fill in Outgoing mail server (SMTP) – type in mail.domainame
- Fill in User Name - type in your complete email address
- Fill in Email Password – type in the password for this email account
- Put a CHECKED/TICKED next to "Remember Password" to save your password
- For Log on using Secure Password Authentication (SPA) – do not check this box
- Once you have filled in the above information, click "More Settings" button
- Click "Outgoing Server" TAB (on top)
- Checked (TICK) "My outgoing server (SMTP) requires authentication"
- Select the radio button "Use same setting as my incoming mail server"
- Click “OK" to confirm the settings.
- Finally, click Next and then click Finish to complete your email setup.
+
Configuring your mailboxes in Mozilla Thunderbird
- Click on the "tools" TAB
- Click "Account Setting"
- Click on the big square button that says "Account Actions"
- Click "Add Mail Account"
- Fill up the mail account setup
- Click "Continue"
- Click "Manual Setup"
- Select Account Type as "POP3/IMAP"
- Fill in Incoming mail server (POP3/IMAP) – type in mail.domainame
- Fill in Outgoing mail server (SMTP) – type in mail.domainame
- Fill in User Name - type in your complete email address
- Once you have filled in the above information, click "Done" button
- Go back to the "Account Setting" as step 1-3
- Go to Outgoing Server (SMTP) and choose account -> Click Edit
- Fill up the 'SMTP server'
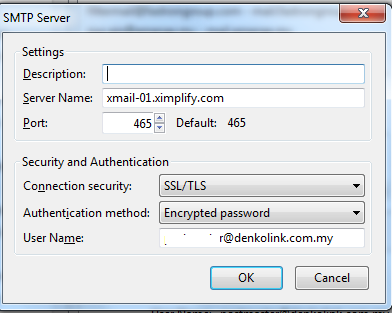
- Click "OK" then the test screen will appear showing both incoming and outgoing server tested successfully
- Finally, click Close and then click Finish to complete your email setup
+
Configuring your mailboxes for Microsoft Entourage for MAC
- Open Entourage.
- In the First name field, type your first name.
- In the Last name field, type your last name.
- Click the right arrow button.
- Click the setting "I want to start using Entourage without importing anything" radio button in the "What do you want to import?" area.
- Click the right arrow button.
- Check the box next to Enable Junk Mail Filter.
- Click the right arrow button.
- In the Your name field, type your name.
- Click the right arrow button.
- Select "I already have an email address I'd like to use"
- In the E-mail Address field, type your full email address (e.g., [email protected]).
- Click the right arrow button.
- Click the arrow box on the My incoming mail server is a(n) pop-up list and choose POP.
- In the Incoming mail server field, type your Incoming mail server (POP) as mail.domainame
- In the Outgoing (SMTP) mail server field, type mail.domainame
- Click the right arrow button.
- In the Account ID field, type your full email address (e.g., [email protected])
- In the Password field, type your email password
- Check the box next to Save password in my Mac OS keychain if you wish to have your password saved.
- Click the right arrow button.
- In the Account name field, type your full email address (e.g., [email protected]).
- Check the box next to Include this account in my Send & Receive All schedule.
- Click the Finish button.
+
Configuring your mailboxes for Apple IOS 3/4/5 based IPAD and IPHONE
- Tap on "Settings" from your main screen;
- Tap "Mail, Contacts, Calendar" button;
- Tap "Add Accounts";
- Tap "Other" button;
- Enter "Name";
- Enter "Email Address";
- Enter "Password";
- Enter "Descriptions" (Just a description to define your email account, e.g. Michael's POP Email Account)
- Press "SAVE" in the upper right hand corner;
- Choose the type of account as "POP";
- Key in the incoming mail server: mail.domainame
- Enter Username: YOUR EMAIL ADDRESS;
- Enter Password: YOUR EMAIL PASSWORD;
- Key in the Outgoing mail server: mail.domainame
- Enter Username: YOUR EMAIL ADDRESS;
- Enter Password: YOUR EMAIL PASSWORD;
- Click "SAVE" on your right hand corner;
- Tap on "Settings" from your main screen;
- Tap "Mail, Contacts, Calendar" button;
- Tap on YOUR EMAIL ACCOUNT;
- Scroll down to the Outgoing Mail Server;
- Change "Authentication" to "Password";
- Make sure the SSL is ON;
- Click "SAVE" on your right hand corner;
+
Configuring your mailboxes for Apple Mac Mail Application
- Open Mail (click it on the Dock or open it from the Applications folder).
- If the "Welcome to Mail" assistant does not appear, choose Add Account from the File menu.
- Fill in the Full Name, Email address, and Password fields.
Note: Your email account password will be stored in Keychain to allow you to automatically log in to your email account when you open Mail.
- Deselect "Automatically set up account" if it is enabled. Click Continue to proceed.
- Choose the proper Account Type.
- Give your account a useful description, such as "Anne's Gmail account" or "Juan's Yahoo! email account". It can be called whatever you want.
- Enter your Incoming Mail Server as mail.domainame, User Name and Password. Click Continue to proceed.
- If prompted, enter your Incoming Mail Security settings. Click Continue to proceed.
- For Outgoing Mail Server, a useful description such as "My Outgoing Mail Server" or "Domains Outgoing Mail Server".
- Enter the Outgoing Mail Server details as mail.domainame
- If necessary, select "Use Authentication" and enter your User Name and Password. Click Continue to proceed.
- If prompted, enter your Outgoing Mail Security settings. Click Continue to proceed.
- Verify your settings in the Account Summary. Check "Take account online". Click "Create" to complete the process.
+
Configuring your mailboxes In an Android based Phone Application (SAMSUNG GALAXY NOTE/S2/S3)
- TAP on the “Application” icon from your main HOME screen;
- TAP on “Email” icon;
- On TOP left of the email application, TAB on your current account name;
- the list of accounts configured will appeared;
- Press the “Menu button” on the left side of the screen;
- TAP on “Add Account”;
- Fill in the email address;
- Fill in the password;
- Scroll down screen and TAB on “Manual Setup” button;
- Choose POP3 Account;
- Fill in “User name” with email address;
- Re-Enter password again;
- Next to “POP3 Server”, type in the Incoming Mail Server to mail.domainame
- for “Security Type”, choose "none";
- set “Port” as 995 for incoming server;
- set “Delete email from server” according to your choice from the drop down menu;
- Press NEXT button to proceed, wait for the “Outgoing server settings” to appear;
- Change SMTP server setting to mail.domainame
- for “Security type”, choose "none";
- Set port to 465
- Tick on "Require Sign-in";
- Type in “user name” with full email address;
- Re-Keyin password again;
- Press NEXT button to proceed, wait for the “Account options” to appear;
- Under “Email check frequency”, choose from the choice of drop down menu. Recommended setting is 5 minutes;
- Place a TICKED on the box "Notify me when email arrives";
- Press NEXT button to proceed, wait for the “Account options” to appear;
- Give the Account settings a name of your choice under the "Give this account a name (Optional)" settings;
- Under “Your Name”, type in the name that you wish for the recipient to see when the email is sent from this smart mobile;
- Press “Done” to finalize the account settings;
- you are now ready to send and receive email from now on using this phone.
PART 2 of 2) HOW TO CONFIGURE SMTP AUTHENTICATION
Below steps by steps guide indicates how to configure SMTP Authentication for email sending in respective computer software or mobile phones. This is required to prevent the bounced back "error 550, We do not relay" error during email sending.
+
SMTP Authentication for Microsoft Outlook 2010 (MSOLK 2K10)
- Click on the "file" TAB
- Click "Info"
- Click on the big square button that says "Account Settings"
- Click "Add or Remove accounts or change"
- Select the email account from the list and click "Change"
- The Internet E-mail Settings appear
- Click "More Settings" Button
- Click "Outgoing Server" TAB
- Put a TICK next to the My outgoing server (SMTP) requires authentication
- Choose "Use same setting as my incoming mail server"
- Click OK
- Click Next
- Click Finish and you are done
+
SMTP Authentication for Microsoft Outlook 2007 (MSOLK 2K7)
- Click on the Tools menu in MSOLK 2K7
- Click on "Account Settings"
- Click "Email" TAB
- Click once on the email account to select the email account
- Click "Change" button
- The Internet E-mail Settings appear
- Click "More Settings" Button
- Click "Outgoing Server" TAB
- Put a TICK next to the My outgoing server (SMTP) requires authentication
- Choose "Use same setting as my incoming mail server"
- Click OK
- Click Next
- Click Finish and you are done
+
SMTP Authentication for Microsoft Outlook 2000/2003 (MSOLK 2K/ MSOLK 2K3)
- Click on the Tools menu in MSOLK
- Click on Email Accounts
- Click View or change existing e-mail accounts
- Click Next
- Highlight an email account
- Click Change
- Click More Settings
- Click Outgoing Server tab
- Check the My outgoing server (SMTP) requires authentication
- Make sure that Use same setting as my incoming mail server is selected
- Click OK
- Click Next
- Click Finish and you are done
+
SMTP Authentication for Microsoft Entourage for MAC
- Open Entourage.
- Click on Tools and select Accounts
- Select the Mail tab
- Check your incoming and outgoing mail server.
- Select "Option" tab (on top)
- Choose "advanced sending options"
- [TICK] SMTP Servers requires authentication
- Use same setting as my incoming mail server
- Click OK
- Click Ok (Close your account settings
+
SMTP Authentication for Apple IOS 3/4/5 based IPAD and IPHONE
- Press HOME button
- TAP on "Settings" icon
- Select the Mail tab
- TAP on "Mail, Contacts, Calendars"
- TAP into the account to configure
- Scroll downwards to the bottom of the Account setting
- Under "Outgoing Server", TAP on SMTP
- TAP on the mail server under "Primary Server"
- Server must be "ON"
- Fill in "Host Name" with your Domain's Outgoing Server
- Fill in "User name" with your FULL EMAIL ADDRESS
- Fill in "Password" with your EMAIL PASSWORD
- Use SSL must be "ON"
- "Authentication" type is Password
- "Server Port" is 465
- TAP on "Done" blue button on top corner right to confirm settings
- TAP button on top corner left to go back to the account setting
- TAP "Done" blue button on top corner right again to finalize account setting
- Press HOME button to go to main screen
- TAP on "Mail" icon and compose a test email to your own email address to test
+
SMTP Authentication for Apple Mac Mail Application
- From the Mail menu choose Preferences
- On the lower right corner of the window, click on Server Settings... (Under Outgoing Mail Server (SMTP)). If this option is not visible, make sure you have the correct mail account selected, and that the Accounts and Account Information tabs are selected.
- Pull down the Authentication menu and select Password.
- Enter your username and password.
- Click OK.
+
SMTP Authentication for Email Enabled Printer/ Fax Machines
- Login to the printer configuration screen and find the SMTP outgoing server setting page. Set the SMTP Authentication to “ON” (or ENABLE/ACTIVE) and key in the necessary email and password. Save the changes.
- Set the POP before SMTP to ON (or ENABLE/ACTIVE). Save the changes.
Email Archiving
What is Ximplify archiving solution?
Ximplify provides a secure, tamper-proof central storage for all company emails and files while allowing fast and easy access to all archived items if required. Our retrieving function allows companies to zoom into particulars such as: domain, contact, data range and more. We complement every Ximplify minimum purchase a 50GB archiving storage attach to your domain. To upgrade your email archiving storage, click here.
Archiving VS Back up?
Backups are primarily used for operational recoveries, to quickly recover an overwritten file or corrupted database. The focus is on speed, both to back up and recover, and on data integrity.
Archives, on the other hand, typically store a version of a file that's no longer changing, or shouldn't be changing. Searchability is more critical in archives. In addition, importance is placed on the ability to maintain data integrity and retention — with Ximplify, archived data is kept for up to 1 year.
Email Archiving and International Compliance (Sarbanes Oxley act)
Our archiving solution is used worldwide to comply with compliance act on email archiving. Companies can access any email that is requested for email compliance purposes and provide a guarantee that these emails have not been tampered with – a major requirement in corporate litigation cases.
How does Ximplify archiving helps?
Companies can access any email that is requested for email compliance purposes and provide a guarantee that these emails have not been tampered with – a major requirement in corporate litigation cases. With Ximplify, companies can retrieve the archived emails anytime at anywhere.
How to retrieve archived emails?
Simply contact our technical team at +603 7841 3888 or drop us an email at [email protected]. Our support team are on hand to support you in a timely manner.
What is the price to retrieve archived emails?
Retrieving 100 GB worth of emails is RM 600/year. No surprise fees and hassle free.
Domain
How to transfer domain?
A..com.my
Please email your Administrative Contact Username and Password to [email protected]
B..com
- Unlock the domain name or under Active status
- Domain EPP code / domain authorization code
- To check the whois information on the validity of the administrative contact email address.
- Whois privacy unsubscribe (means all the whois information able to view)
- Domain name Login URL, Username & password.
- Domain name must be registered more than 60 days;
- Domain name must be renewed for more than 45 days;
Note:
- Item [a, b c] information is compulsory for domain transfer if item [e] domain login information can not obtain.
- Some of the registrar (like Goddady) item [a, b, c] can be modify via the domain login information (item e) means, if you got the item e information, the rest can be done automatically. This is limited to certain registrar only.
Please be informed that, the whole process of domain transfer may take maximum of 10 days, during this period, you are NOT allow to modify the DNS name server for the hosting transfer. Hence admin usually will request to do the hosting transfer first unless being advise reversal.
How to buy domain?
You can start from here. Follow the step-by-step guide to buying a new domain.
Others
Any integration with on-premise AD (Active Directory) & MS Exchange (addressbook, user control)?
Yes, but this requires additional license purchase and is not included in standard subscription. Ximplify is unique because we are able to provide additional customization and integration based on various customer's special requirement. We can provide local support as well as system integration services.
How migration works for on-premise mail sever? Supported by RapidCloud?
Yes, mails on existing on-premise mail servers can be migrated over to Ximplify. With proper planning, it can be done smoothly with no downtime. The links below provide a detailed guide on how this can be done. Alternatively, our migration team can assist the client accordingly to ensure a smooth migration.
https://rapidcloudmy.freshdesk.com/support/solutions/articles/14000029283-guideline-to-do-mailbox-migration
Any backup on cloud mailbox/email server level? What is the retention?
The mail server only backups vital configuration and settings. The data is not backed up at Ximplify because it serves as a copy of your mails on the webmail to allow mails to be accessed at anytime, anywhere, across any devices. A copy of the mails should be downloaded and stored in your computer. In normal backup practice, users will also backup a copy of their data to their portable harddisk or have their own/office computer backup policies using backup software.
Is the webmail interface customizable?
Due to security setting and SSL configured into every client's email system, the webmail is not customizable.
Any mobile application on IOS/Android?
Ximplify mail system is compatible with all available IOS / Android / Windows Mobile email applications in the market.
Is the xmail fully integrated with Microsoft Outlook?
Yes it is.
Any Product/Features/Usage comparison with other Cloud Email providers? Microsoft/Google/Rackspace/AWS
Yes, please refer to the comparison table below.
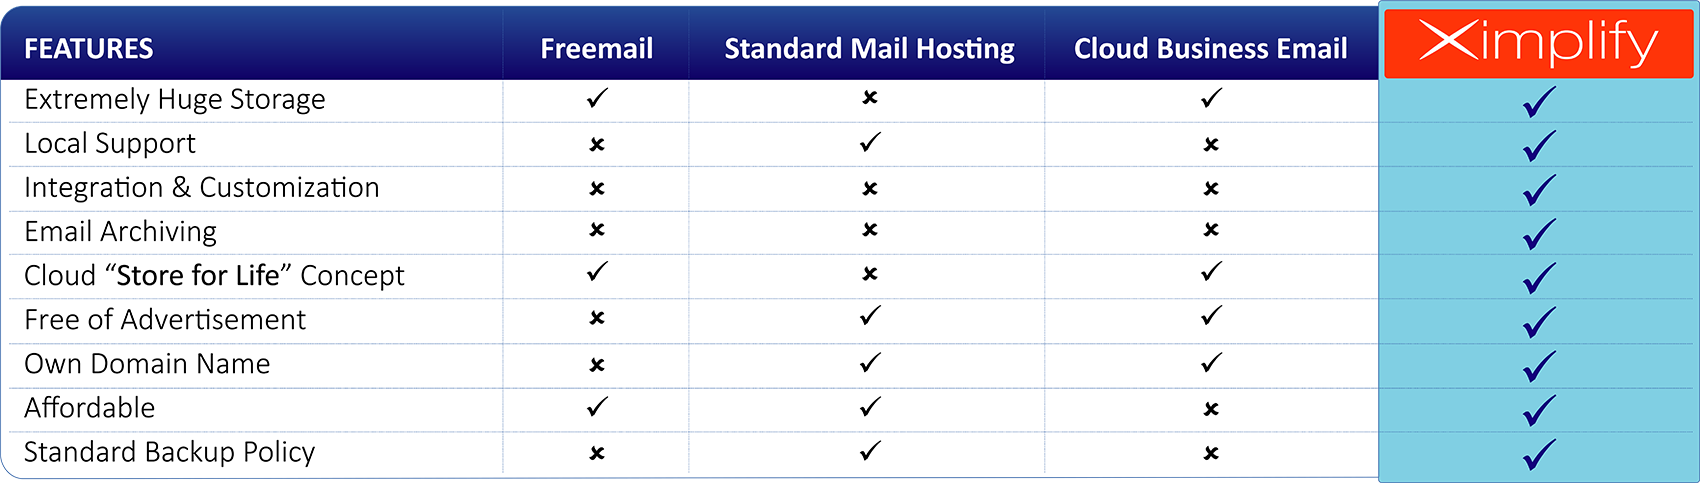
Any Product/Features/Usage comparison with other local Cloud Email providers?
Yes, please refer to the comparison table below.
What is Security & Data Visibility & Resource Availability on the cloud solution?
Ximplify is based on standard email protocols and uses SSL encryption.
What are the packages and charges?
Ximplify is available in huge 20 GB / mailbox and 50 GB / mailbox plans. Subscriptions are flexible with monthly or yearly payments. Please refer to our website for more information.
Campaign Terms & Conditions – Double Email Storage
Eligibility
This promotion is valid for new and existing customers who purchase or renew any of the following Email Hosting plans:
- Starter Plan
- Business Plan
- Pro Plan
Customers must have an active and fully paid Email Hosting subscription to be eligible for the Double Storage add-on.
Promotion Mechanism – Double Storage Add-on
To enjoy the upgraded mailbox quota, customers must:
- Purchase or renew an Email Hosting plan; AND
- Subscribe to the Double Storage add-on for all subscribed users under the same domain.
The Double Storage add-on:
- Must follow and correspond exactly to the total number of users subscribed under the existing Email Hosting plan;
- Must be purchased for all subscribed users under the same domain;
- Cannot be partially applied to selected users;
- Cannot be purchased as a standalone product.
Upgraded Quota & Per-Block Pricing Examples (per 5 users / per year)
- Starter Plan (5 users per block)
RM185 + RM29 add-on → 5GB upgraded to 10GB
- Business Plan (5 users per block)
RM255 + RM99 add-on → 20GB upgraded to 40GB
- Pro Plan (5 users per block)
RM510 + RM299 add-on → 50GB upgraded to 100GB
Note: For multiple user blocks, the add-on price is multiplied accordingly. Examples:
- Starter Plan, 10 users → RM370 + (RM29 × 2) add-on
- Business Plan, 10 users → RM510 + (RM99 × 2) add-on
User Block Requirement
All Email Hosting plans and corresponding Double Storage add-ons are strictly sold in fixed user blocks of five (5) users.
- Customers may only subscribe in multiples of five (5) users (e.g., 5, 10, 15, 20 users).
- Subscription quantities that do not meet this requirement (e.g., 6, 13 users) are not permitted.
- If additional users are required, customers must upgrade to the next full block of five (5) users.
- This rule applies to both the base Email Hosting plan and the Double Storage add-on.
Partial upgrades are not allowed; the add-on must cover all users under the domain.
Storage Upgrade Entitlement
The upgraded storage quota will be provisioned upon successful payment confirmation.
The upgraded quota:
- Applies to all mailboxes under the subscribed account;
- Will remain active until the expiry date of the associated Email Hosting plan.
Example:
- If a customer’s current hosting plan expires on 1 May 2026, and they pay for the hosting renewal + Double Storage add-on on 23 February 2026, the upgraded storage will be active immediately and remain valid until 1 May 2027.
- No prorating will be applied for the additional period; customers benefit from the full duration up to the next plan expiry.
The Company reserves the right to withhold or suspend provisioning if payment is reversed, disputed, or incomplete.
Validity Period
The Double Storage add-on remains valid for the duration of the associated Email Hosting plan. Upon plan expiry, mailbox storage will revert to the original quota unless the add-on is renewed.
If mailbox usage exceeds the original quota after expiry:
- Email sending and receiving may be restricted;
- Customers must reduce mailbox usage or renew the add-on to restore functionality.
Post-Renewal Purchase Window
For customers who have renewed their Email Hosting plan:
- Within fourteen (14) days from the payment date
May purchase the Double Storage add-on only.
- After fourteen (14) days from the payment date
Must renew the Email Hosting plan for another one (1) year
AND purchase the Double Storage add-on to qualify for this promotion.
The 14-day period is calculated based on the official payment receipt date.
Plan Assignment per Domain
Each domain is limited to a single Email Hosting plan subscription. All mailboxes under the same domain must be provisioned under the same plan type, and mixing or combining different hosting plans within a single domain is strictly prohibited.
Upgrade & Downgrade
- Plan upgrades are permitted during the validity period; any upgrade must apply to all users under the same domain.
- Downgrades are permitted, but must also apply to all users under the same domain.
- Downgrades will not be allowed if mailbox usage exceeds the downgraded quota.
- Partial upgrades or downgrades (e.g., applying to only some blocks of users within a domain) are not permitted.
Example:
- If a domain has 10 users and the customer upgrades the plan, all 10 users must receive the upgrade.
- Similarly, if downgrading, the downgrade applies to all 10 users; no block of users can remain upgraded while others are downgraded.
Early Termination
If the Email Hosting plan is terminated before expiry:
- The Double Storage add-on will automatically terminate;
- No full or partial refund will be provided for any unused portion.
Taxes
All stated prices are exclusive of 8% Sales and Service Tax (SST).
SST will be applied in accordance with prevailing Malaysian tax regulations.
Non-Transferable & Non-Refundable
This promotion:
- Is non-transferable
- Is non-refundable
- Cannot be exchanged for cash, credit, or other services
Promotion Combination
This promotion cannot be combined with other promotions, discounts, or vouchers, unless otherwise stated. However, existing customers may combine this promotion with the:
"Renew 2 Years Free 1 Year" promotion, subject to the following:
A. Purchase Together with Renewal
When the Double Storage add-on is purchased together with the eligible multi-year renewal:
- Customers are only required to pay the add-on fee for the paid subscription term.
- The free 1-year renewal will automatically inherit the Double Storage entitlement at no additional charge.
- The Double Storage validity will follow the full promotional hosting subscription period.
B. Purchase After Renewal (More Than 14 Days Later)
If the customer subscribes to the Double Storage add-on more than 14 days after the renewal date:
- The customer is required to:
- renew the Email Hosting plan for an additional 1 year, and
- purchase the Double Storage add-on for that 1 year.
- The Double Storage entitlement will then apply to the entire hosting subscription period, including the previously purchased promotional term.
Limitation of Liability
The Company shall not be liable for:
- Data loss due to customer action or failure to manage storage usage
- Service interruption caused by quota exceedance
- Any indirect, incidental, or consequential damages
Customers are responsible for maintaining regular email backups.
General
The Company reserves the right to amend, modify, suspend, or terminate this promotion at any time without prior notice.
Any subscriptions or add-ons that have been confirmed and fully paid prior to such amendment, modification, suspension, or termination shall remain valid and continue in full force for the remainder of the applicable paid subscription period.
Any such changes shall apply only to new purchases or renewals made after the effective date of the change.
Support Portal
Knowledge base Support Portal
Click here go to knowledge base Support Portal


